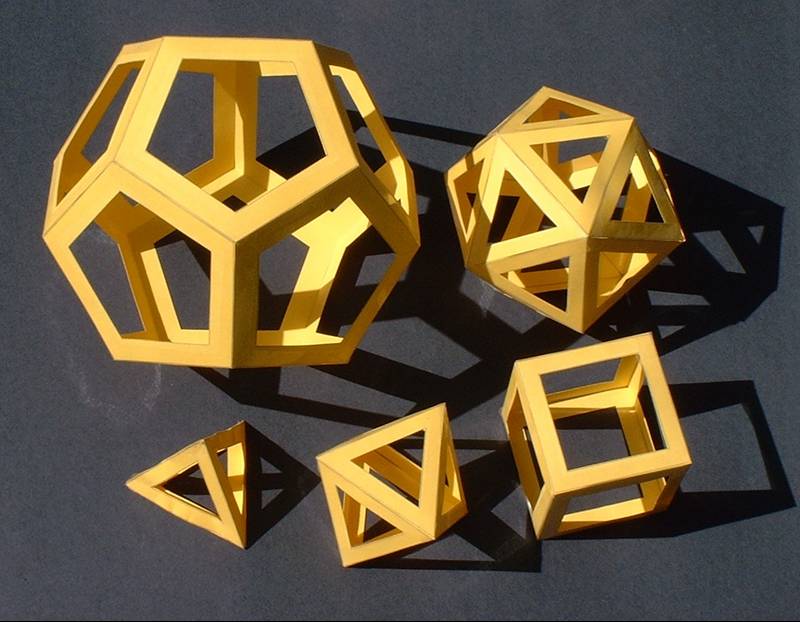
Five fundamental 3D forms that everyone
should
be familiar with are the Platonic
Solids. Next week we will make computer models of
them in various ways, but before you can do that you must understand
them yourself. The best way to get to know the Platonic
solids is to make paper models of them by cutting out polygons and
taping them together. Use one strip of tape per edge. The models above
have open faces in the "solid edge" style that Leonardo invented. That
lets you look through them to see the front and back at once. You could
make them that way, but it takes extra time to cut all the holes. (If
you do, it is faster to use a knife than scissors for the interior
cuts.) So I recommend solid faces with no holes for your first
set.
Instructions:
- Get card stock
in the color(s) of your choice. This is heavier paper than ordinary
copy paper, yet still flexible enough to bend around the rollers in
copy machines and computer printers. Any stationary store that sells
copy paper also sells card stock.
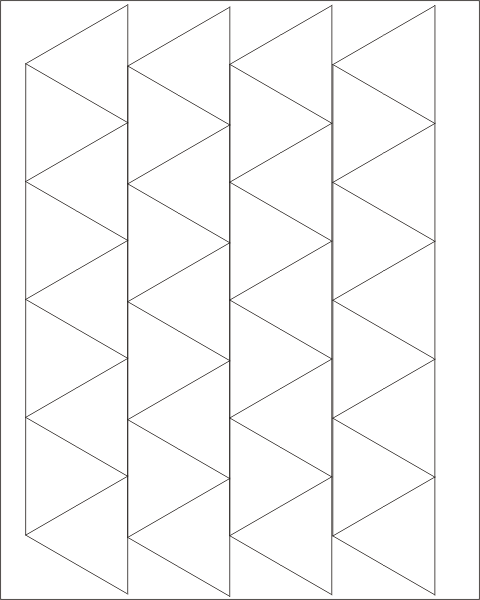
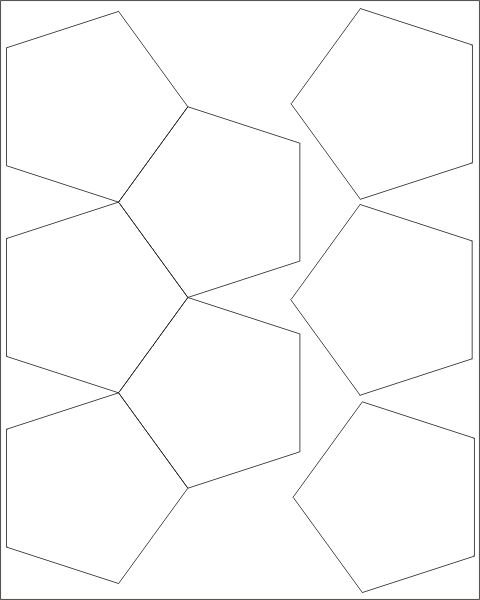
- Print out the templates for triangles,
squares, and pentagons. If you are making just one
set of Platonic solids, you'll need four sheets of card stock---print
out two copies of the pentagon template and one copy of the triangles
and squares. If you are doing this with a group, see the
quantites below.
- Cut out the polygons you need. There are some extras you don't
have to cut out.
- Tape two polygons together along the edges using one of two
systems: either tape on the outside, or tape on the inside. Taping the
inside looks much crisper as the tape ends up hidden. In either
case the key is to exactly butt the edges together and slide one edge
along the other until the corners are precisely aligned. If you
discover that one edge was cut to be slightly longer than the other,
center the short one in the long one so half the error is at each end.
At first you can position adjacent pieces on a table and tape over the
butted edge. But once you start closing it up to be three-dimensional,
a good method is to put tape on one of the two pieces and crease it
back (folding at the edge) so it is out of the way, then align the
polygons and then make the tape connection to the second piece.
- Pay attention to how many faces meet at each corner:
- tetrahedron: 3
triangles
- octahedron: 4 triangles
- icosahedron: 5
triangles
- cube (hexahedron): 3
squares
- dodecahedron: 3
pentagons
- To tape the last face, if using the tape-on-the-inside method,
first attach one edge, so it is hinged like a door. Then put tape
on the insides of the edges around the opening, crease them to lie flat
in the plane of the "closed door", and close the door.
Observe:
Fill in this table and look for patterns:
|
number
of faces
|
number
of vertices
|
number
of edges
|
#
sides on
each face
|
#
faces at
each vertex
|
Tetrahedron
|
4
|
|
|
3
|
|
| Cube |
6
|
|
|
4
|
|
| Octahedron |
8
|
|
|
3
|
|
| Dodecahedron |
12
|
|
|
5
|
|
| Icosahedron |
20
|
|
|
3
|
|
Notes:
- If copying these templates for a class of students: make one
sheet of triangles per student, one sheet of squares per three
students, and three sheets of pentagons per two students.
- Some people will want to not make every cut, and just fold on
the lines. They can argue that it is inefficient to cut the polygons
apart and then immediately tape them back together again. But that
leaves some edges as folds and some as taped cuts, which doesn't look
as good and doesn't allow the use of multiple colors. I find
that
starting with individual polygons is more systematic, so students make
less errors.
- A nice variation is use various colors so touching faces are
always different. For the tetrahedron you need four colors, for
the octahedron you can use two colors, like a checkerboard. For the
icosahedron there is a lovely way to use five colors (with four
triangles of each color. For the cube, it is easy to do three colors.
For the dodecahedron there is a clever way to use four colors (three
pentagons of each color). Finding the icosahedron and dodecahedron
patterns is a good challenge.
- These techniques can be applied to Archimedean polyhedra and
others.